To kick things off, our Photoshop expert DW96 has created a groovy Video / Screencast which walks through the high level basics of the Photoshop CS5 Interface and each of the basic tools / functions you should become familiar with on the Photoshop toolbar. The video and the write-up below will not dig very deep into any of the tools as we’ll cover each in detail in later groovyPost’s. So with that being said, let’s jump right in!
Step 1 – Setup your own Workspace
When starting Photoshop for the first time, I recommend setting up the tools you will later use the most often. If you look in the upper right of your Photoshop window, you’ll see that there are some presets already setup for you which configures your Workspace. These presets are called Workspaces… imagine that!
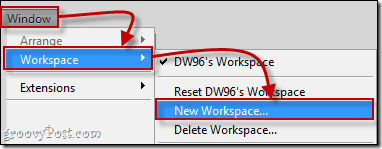
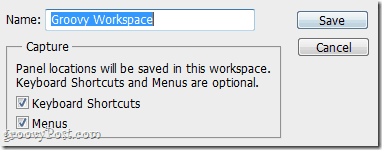
The default workspace is called Essentials however as you can see above. But you don’t want to go with the essentials only, do you? You’ll want way more out of Photoshop. Way more. Take a look at some of the other Workspaces that come pre-made on Photoshop CS5 and then move on to making your own. Use the Windows menu to choose all the items you want. Whatever panels you choose to keep, make sure you have Layers, Navigator, Swatches and History open on at all times. These are the basic panels which you’ll be using all the time. Lastly, save your Workspace by clicking Window > Workspace > New Workspace. Name your Workspace and optionally set it to save all your settings.
Step 2 – Getting To Know The Tools
Move Tool – Not much to say here. If you want to move a layer, item text, or pretty much anything, grab this tool beforehand and then get movin’! Marquee Tools – This is the tool you will be using to make selections in your image. The selected part of the image will appear surrounded by the so-called “marching ants” and doing the perfect selection will be one of the most important things you’ll need to learn for image editing. Lasso Tools – If you ever need to make a freehand selection, the lasso tool will surely help you. The other useful tools hiding behind it are the polygonal and magnetic lasso. The magnetic lasso is extremely useful if you’re trying to go along an edge but keep making mistakes with the regular lasso. Magic Wand Tool – The magic wand tool will help you instantly select large single colored areas in one single click, and the Quick Select Tool will allow you to use a magical brush to paint over the areas you want selected. Quick Select Tool – Tired of using those boring lasso and marquee tools? Check out the Quick Select Tool. It’s way faster than using Quick Mask Mode and you will grow to like this if you like using brushes for everything. Crop Tool – If something is looking a little too big for you, you’ll find yourself using the crop tool often. And the two useful Slice Tools hiding behind it will be in your hands quite often if you’re going to be using Photoshop to design webpage templates. Slice Tools – If you’re going to use Photoshop to make webpages or if you simply want every single element equally apart from everything that surrounds it then you’re going to fall in love with the slice tool. Simply put – it chops and slices your image into separate segments and it can also help you measure out things you’ll need. Eye-Dropper Tool – Not really much to say here. The eye-dropper tool will let you easily pick up a specific color from your image. Ruler – Captain Obvious here! Thats right! The ruler will measure stuff! OK, now a little more seriously – the Ruler can help you measure distances from one point to another in your image without jumping through hoops. It’s actually very handy and I use it a lot. Notes – If you need to send out a Photoshop project in a PSD file to a buddy or workmate and you need to tell him about something specific about a segment in the image, use Notes! They will let you add a Note to your Photoshop document where you can record whatever you want. Count Tool – With this you can number separate sections of your image. At first sight it may not look as useful, but just like the Notes Tool, it starts to get useful when you need to send your PSD file around for collaboration with someone. Spot Healing Brush Tool – If you ever need to remove a scratch or just remove something from the image that doesn’t belong there the Spot Healing tool is where you go. Using the Spot Healing Brush Tool with the new Content Aware Fill in CS5 you’ll pretty much be able to fix anything “wrong” with your image. Patch Tool – Like when patching your jeans, Photoshop’s unique patch tool will pick up a part of the image and patch it up with another part. Easy to use and very useful for removing small objects in low and high detail areas. Red Eye Tool – Aye… the dreaded red-eye. If you like taking pictures using a flash, you bound to run into Red Eye. Fear not, as Photoshop is prepared for everything, even red reduction with this easy to use tool. Brush Tools – A brush. It can be soft, hard, big, round, square, or even completely customized to make incredible effects. And with the mixer brush tool, you can really go deep into the world of digital paintings since you’ll be able to set just how dry, wet and loaded your artistic brush is. Pencil Tool – If you have used Microsoft Paint then this tool you would be familiar with. Making a tiny 1px square hard-line, the pencil tool is more than perfect for drawing the outline on your new animated character! Clone Stamp Tools – If you ever need to edit something out of an image and those complicated spot healing brushes aren’t your thing, try the Clone Stamp. It will let you sample one area of an image and paint over another, while simultaneously sampling from the area you choose. It’s tough to explain by text, so try it out yourself. You’ll be amazed by how often you’ll start to use this tool. History Brush Tools – Want to make your image travel back in time? No probs. The history brush will help you paint over parts of an image and you’ll be painting an earlier version of your image over it. The history brush is easily configurable from the History menu. Oh, and for an even flashier effect, try the Artistic Art History Brush which although is very similar to the Mixer brush tool, will bring some additional options and effects to your brush. Eraser Tools – Nobody is perfect. That’s why we’ll often need to go to our history panel or erase stuff. Well that’s what the erasers are for. One more interesting type of eraser is the Magic Eraser. It will help you instantly knock off single color backgrounds and if you’re planning on using Photoshop for creating a lot of PNG images, than this is going to become your favorite tool of all time. Gradient Tool – It’s always good to have multiple color backgrounds, but let’s keep these multiple colors softly fading into one another, shall we? Indeed we will. The gradient tool can take a boring solid background and add some groove to it by slowly transitioning to a new color. Paint Bucket Tool – Just like in Microsoft Paint, Photoshop has its own bucket tool too. Fill in your selection with a single solid color using the paint bucket tool and a single click. Blur Tool – Not everything needs to be crisp and clear. Sometimes you want to blur things up, whether it’s for an artistic idea or something you want to censor in a screenshot, you’ll find the Blur Tool does its job perfectly. Sharpen Tool – Get things sharp and clear! That’s just what the Sharpen tool is for. Although your images may seem way more crisp and sharp with this tool, watch out not to overuse it. When you’re completely zoomed out of your image everything will look perfect. But zooming in just a bit closer will reveal high image quality loss and color contamination. Just a tip to be careful with the tool. Smudge Tool – Imagine you have a wet canvas. Now you take your finger and smudge it across its surface. This is the same effect you will get when using the Smudge tool on your image. Not only is this tool fun but you can also create some groovy effects! Dodge Tool – Make stuff brighter. The Dodge tool is great for effects but don’t go to heavy on it. Burn Tool – Make stuff darker and create very groovy effects using the Burn tool. Use the tool sparingly as just like the sharpen tool it can decrease image quality and cause color contamination. Sponge Tool – De-saturate colors in s snap. Go as heavy as you want on this – the heavier you go the more black-‘n’-white you’re bringing into your image. Pen Tools – These are the tools that you will use to make paths. Paths are pretty useful, mostly if you know how to use them right. Type Tools – Simply put, the type tools let you add text to your image. Type Mask Tools – Makes a selection instead of outputting text. Very interesting feature worth a look and worth taking some time to make yourself some interesting text effects. Path Selection Tools – A tool used for selecting and moving your paths. Shape Tools – Ooffff… Time for another Paint reference… Yet again, just like in Microsoft Paint you can add some shapes to your image, but seriously, nobody uses these tools, so don’t act all childish drawing squares and lines. ;) 3D Rotation Tools – These are going to be the tools for rotating your 3D objects on your canvas. These are more advanced features you should play with when you get to that level. 3D Camera Rotation Tools – We still have some more tools related to 3D imaging. This time you’ll be using these tools not to rotate the 3D objects themselves, but the cameras looking at them. Hand Tool – When you’re working really, really, really zoomed in, you’re going to need to move around in some way and the Navigator isn’t always the best option available. For these occasions we have the hand tool which allows you to easily move back and forward through your image. Rotate View Tool – If you’re going to use Photoshop for drawings then you will simply love this! The Rotate View Tool will allow you to rotate your canvas sideways at a degree you choose. It’s like rotating the sheet of paper on which you draw in real life! Simply an amazing feature if you ask me, I’m sure you’ll love it too. Zoom Tool – 100% zoom is great but sometimes you need to back away or zoom into your image. The zoom tool will let you do just that with ease.
Step 3 – Improve Performance By Tweaking The Settings
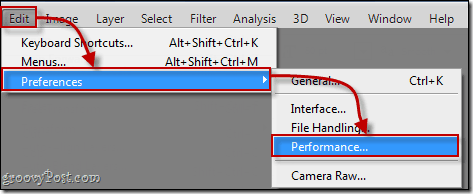
Lastly, let’s make Photoshop run as smooth as possible. We’ll head over to Edit > Preferences >Performance.
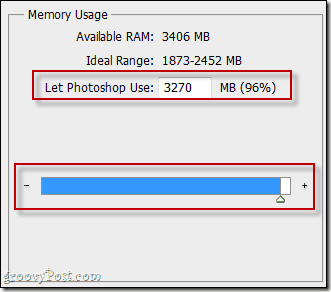
First, take a look at the Memory Usage section. If you’ve got a powerful PC with lots of RAM then bump up how much memory Photoshop should try to grab. As you can imagine, Photoshop is one of those apps which needs a lot of memory to run smooth. Just grab the slider and put it as close to that little “+” sign as possible.
Now, taking a look to the right of the Memory Usage you’ll see the History & Cache section. You may not want to touch any of these settings, but I advise you to bump up your History States just a bit. As you see in the screenshot below I’ve taken mine all the way up to the maximum.
If you have limited amounts of space on one hard drive and would like to use another drive with more space for your temp/scratch files, then head over to Scratch Disks. From there you can select which drive the temporary Photoshop files be saved. Granted if you have just a single drive, skip this tip.
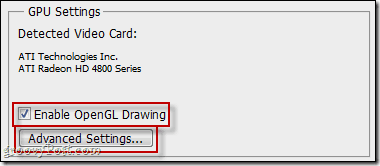
Now get to the GPU Settings. I would advise you to turn on absolutely everything here even if you have a weaker GPU. Start off with making sure that OpenGL Drawings are enabled, then click the Advanced Settings button to go a bit further.
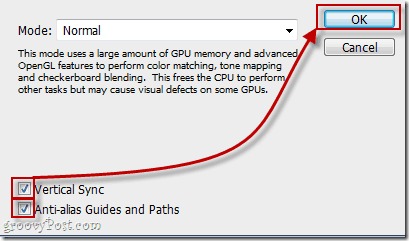
From the advanced settings you will be able to configure your Mode, Vertical Sync and Anti-Aliasing. You can keep the mode at Normal, but the Vertical Sync and Anti-Aliasing should be on for best visual appearance. When you’re done press OK twice to exit out of the two dialogs and Photoshop CS5 will be ready to perform the way you want / need!
When you’re done press OK twice to exit out of the two dialogs and Photoshop will be ready to perform the way you want!
Whew! That’s a lot of learning for one day! Feel free to ask us any additional questions or give us requests in the comments below. As mentioned, today I mainly covered the basics when it comes to the Interface and Improving / Tuning Photoshop CS5 however stay tuned as we continue the series by digging deep into each of the various tools we talked about today! on thing that captured my attention though is your desktop. What are you using to organize all the desktop icons? it really looks cool and so clean? Thanks, -S Comment Name * Email *
Δ Save my name and email and send me emails as new comments are made to this post.


![]()
