Obvious ports, like port 80 and 443, are needed for internet access, while others, like port 3389, allow Remote Desktop access to a Windows PC or server. If you’ve enabled Remote Desktop on Windows over the internet, chances are you’re using the common Remote Desktop Protocol port (TCP/UDP port 3389) to connect. Unless you want every port-scanning hacker to breach your network, you should change the RDP port to something else. Here’s how.
Changing RDP Port Using Windows Registry
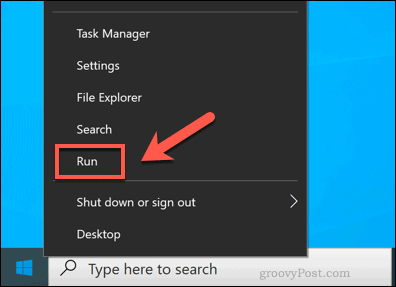
The Windows Registry is a database of configuration settings for Windows services, installed apps, and more. If you want to change the default RDP port from 3389 to a custom port, the easiest way is to change the Registry. Before you begin, however, it’s highly recommended that you manually back up the Registry. If you make a mistake, this will allow you to roll back any changes quickly. To start, open the Windows Registry Editor by right-clicking the Start menu and clicking the Run option. Remember to do this on the PC or server you wish to connect to, rather than the PC you’re connecting from.
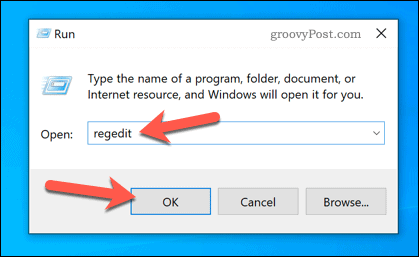
In the Run dialog box, type regedit, then press OK to launch.
This will open the Windows Registry Editor. Using the left-hand menu, navigate through the Registry tree to the HKEY_LOCAL_MACHINE\System\CurrentControlSet\Control\Terminal Server\WinStations\RDP-Tcp folder. In the RDP-Tcp folder, double-click the PortNumber entry on the right.
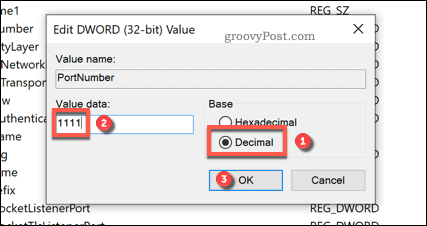
In the Edit DWORD (32-bit) Value box, select the Decimal option. Type the new port number you wish to use, between 1 and 65353, in the Value data box. You’ll need to make sure that this doesn’t match any other common ports. If you choose a common port (such as port 80 for web traffic), you may not be able to establish a Remote Desktop connection afterward.
Press OK to save and restart your PC or server once you’re done. At that point, any attempts to use Remote Desktop will require you to use the custom port you selected rather than the standard port 3389.
Configuring Windows Firewall for Custom RDP Port
Most users will need to make additional changes to their network or system firewall to allow access to Remote Desktop using a custom port. If you’re using a network firewall, consult your user guide for further advice on doing this. However, if you’re using Windows Firewall, you can quickly add your custom RDP port as a set of new firewall rules to allow access. You’ll need to perform these steps twice—one rule each for UDP and TCP ports using the custom port value you selected. To do this, right-click the Start menu and click the Run option.
In the Run dialog box, type wf.msc and click OK to launch. This will open the Windows Firewall management console, allowing you to add new firewall rules.
In the Windows Firewall MMC menu, select Inbound Rules from the left-hand menu. Once selected, press New Rule from the Actions panel on the right.
In the New Inbound Rule Wizard window, select Port from the list of options, then click Next to continue.
As you’ll need to create a custom rule for both TCP and UDP ports, select TCP first from the Does this rule apply to TCP or UDP? options. You’ll need to select UDP when you create your second rule. For Does this rule apply to all local ports or specific local ports?, select Specific local ports and type your custom RDP port value. Click Next to continue once you’re done.
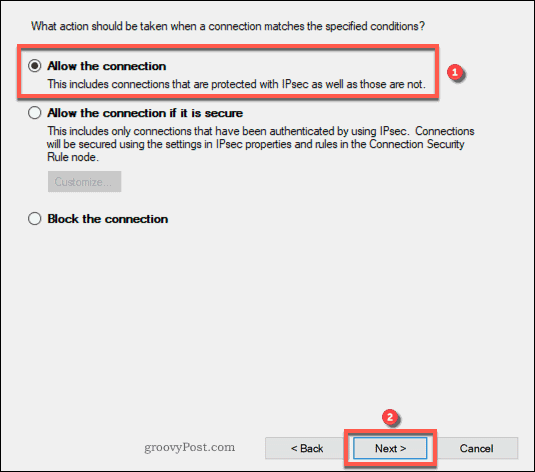
In the Action menu, select Allow the connection, then press Next to continue.
In the Profile menu, identify which network firewall profiles you wish the rule to apply to. Leave all entries enabled for maximum access, or uncheck Public to prevent Remote Desktop connections on public networks. Click Next to continue once you’re ready.
Finally, provide a name for your new network rule (for instance, Custom RDP port – TCP) and a description in the boxes provided in the Name menu. To add the rule, press Finish.
Once added, repeat these steps for a UDP port rule using the same custom RDP port number. Restart your PC or server once the rules have been added.
Connecting to a Remote Desktop Using a Custom RDP Port
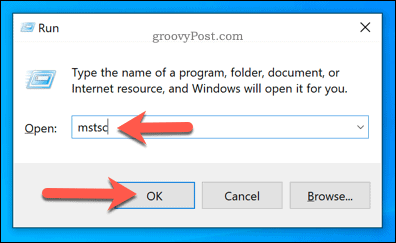
With the RDP port on your Remote Desktop PC or Server set, you’ll need to identify this port when you (or somebody else) wishes to make a connection. To do this using the built-in Windows Remote Desktop Connection tool, right-click the Start menu and click the Run option.
In the Run dialog box, type mstsc, then press OK.
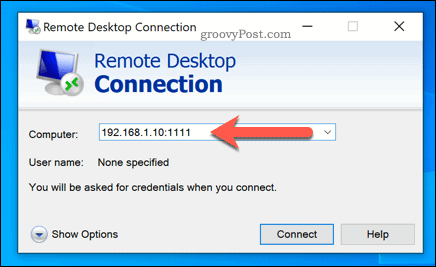
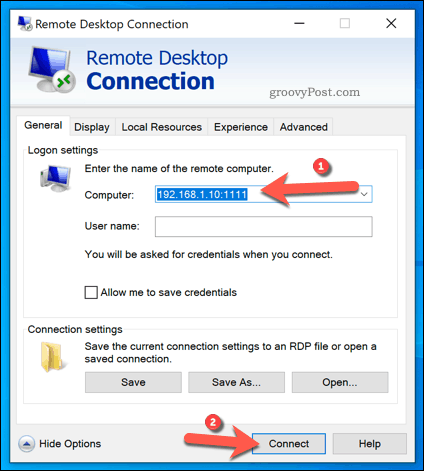
In the Remote Desktop Connection window, type the IP address of the Remote Desktop PC or server you wish to connect to in the Computer box. To use a custom port, add it to the end of the IP address using this structure: ip-address:port. For instance, 192.168.1.10:1111 would connect to an RDP server at 192.168.1.10 on a local network using a custom RDP port 1111.
Make further changes to your RDP connection before you connect by pressing Show Options. You may need to change the connection quality or add authentication details, such as a username and password. When you’re ready, press Connect to establish the connection.
Assuming your settings are correct and your firewall is correctly configured, the Remote Desktop Connection tool should successfully connect at this point, allowing you to control your remote PC or server.
Protecting Your Windows Network Further
While a custom RDP port will reduce the number of attempts to hack a Remote Desktop server over the internet, it isn’t a guaranteed security fix. You’ll need to take additional steps to protect your network, including setting your network profile to private. You could also consider upgrading your router, giving your network additional protection using a hardware firewall. However, if you want a more secure Remote Desktop connection, you may prefer to use a virtual private network, making it even harder for hackers to gain access.


![]()
